I thought installing a pet‑waste digester would be a breeze—turns out it’s a 48‑inch deep adventure in my quiet, high‑elevation yard.
I called 811, marked utilities, then busted a hole with an auger. The concrete‑stabilized base felt like a mini‑construction site, and I laughed at my own seriousness.
I drilled twelve aeration holes, swapped the barrel bottom for gravel, and capped it with a trash‑can lid—odor control, check. I added septic starter bacteria, fed measured portions, and kept the holes clear. When Bacillus activity slowed, I cut back the feed—science, not magic.
Sometimes I’m unsure if the soil will ever be “clean,” but the process feels rewarding, and the garden smells less like a landfill.
Garden Design Tips: Low‑Traffic Oasis with Soil Health Focus
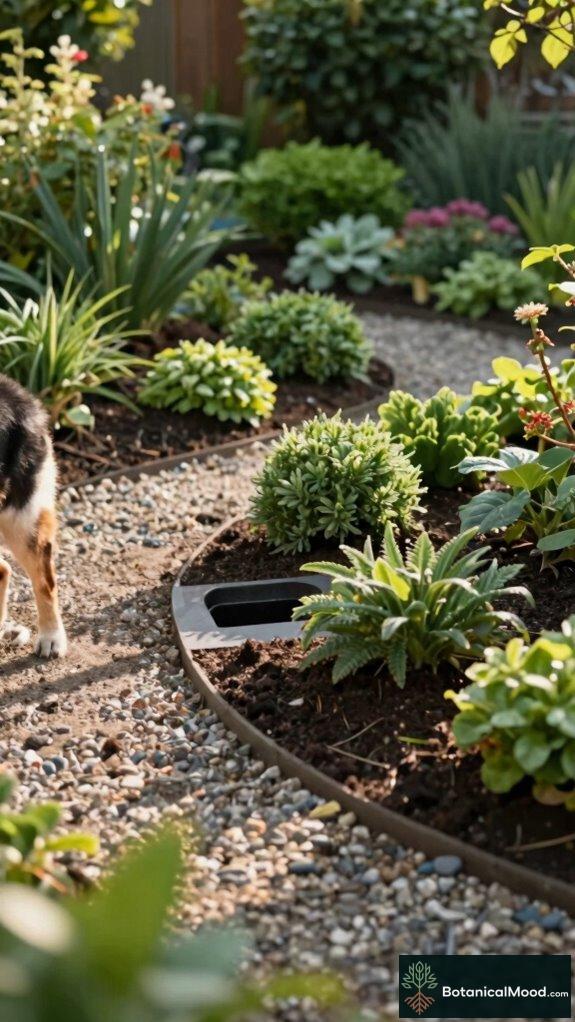
I once turned a neglected corner into a low‑traffic oasis, pairing the digester with drought‑tolerant perennials and a drip‑irrigation system. The compost‑rich soil boosted lavender and rosemary, while mulched pathways kept foot traffic minimal. Integrating rain barrels and raised beds added visual appeal and functional resilience, proving that design and waste management can coexist beautifully.
Quick Takeaways
- Choose a high-elevation, low-traffic corner for stable digester placement and easy maintenance access.
- Call 811 before digging, and excavate about 48 inches deep using a post hole digger or auger.
- Build the digester with a drilled, aerating barrel, remove the bottom, and backfill with gravel for drainage.
- Activate bacteria with septic starter, then add waste in measured amounts and keep air holes clear.
- Use odor-controlled, pet- and garden-safe practices to prevent contamination while supporting cleaner soil.
Digester Placement Rules for Your Yard
To place an underground pet waste digester in your yard correctly, start by choosing a high-elevation spot in a low-traffic corner, because you want it out of foot paths while still staying stable during wet weather and periodic maintenance.
I map the site to optimize yard accessibility for gardeners and pets, yet I keep it unobtrusive. Before I dig, I call 811 to mark cable, electric, sprinklers, water, sewer, telecommunications, and drainage, preventing costly conflicts.
I also avoid low basins, roots, and walkways, since effective waste management depends on consistent drainage and secure lid operation. Using septic treatment tablets will help maintain optimal digester performance and accelerate the breakdown of waste materials in your underground system.
How Deep to Dig Plus Tools You Need
When you plan an underground waste digester, getting the depth right matters as much as choosing the right tools, because digester performance depends on stable placement, drainage, and keeping the system’s active area below surface disturbance.
For underground digesters, I dig about 48 inches, while I’d only use 12–18 inches for standard waste stations, and I obsess over depth accuracy before soil backfill.
I use this tool selection, because clean cuts and level baselines prevent later slumping:
- Post hole digger or auger
- Level and measuring tape
- Knife/cutter plus hammer
- Socket wrench or pliers, quick-setting concrete (two 50-lb bags)
Always call 811. (Lactobacillus spp.)
Build and Set the Underground Pet Waste Digester
I build the underground pet waste digester by starting with a site that stays out of foot traffic, then I dig a post-style pit deep enough to keep the active bacterial zone below surface disturbance, typically around 48 inches, before I set the container level and stable. I use a quick-cut trash-can lid to retain odor control, drill 12 drainage holes through the barrel wall, and fully remove the bottom, then backfill around it with gravel for permeability and improved waste management. Using compost starters in the digester accelerates the decomposition process and ensures safe breakdown of pet waste materials. The best compost aerators enhance oxygen circulation throughout the digester, promoting faster and more efficient decomposition of dog waste.
| Step | Purpose |
|---|---|
| Level container | Uniform decomposition |
| Gravel base | Drainage, aeration |
| Air holes below grade | Safer containment |
This setup drives environmental benefits.
Bacteria Activation, Daily Use, and Troubleshooting Fixes
Bacteria activation starts your underground pet waste digester the moment you set the container and begin feeding it safely. I sprinkle septic starter when I add the first waste, and within 48 hours the process gains momentum, supporting bacterial growth deep in the gravel bed.
For daily use, I keep consistent, small additions, then I monitor odor and liquid level, adjusting feed rate rather than dumping more mass.
- Start with septic starter, then add waste-breakdown bacteria.
- Add daily, after activation, in measured amounts.
- Use maintenance tips: keep air holes submerged and clear.
- Troubleshoot: slow feeding if bubbles/odor spike.
Related Pet-Friendly Garden Proucts
For a pet-friendly garden, I treat “products” as functional infrastructure, not just accessories, because the right add-ons reduce tracking, protect soil biology, and keep plants resilient under paw pressure.
I prioritize pet safe fertilizers and odor-controlled composting techniques that pair clean, low-splash watering with screened compost. I look for slow-release formulas and bio-based amendments, then match them to digestor-fed nutrient cycles, so (Rhododendron spp.) and (Lavandula spp.) stay stable through temperature swings.
Around homes, I’ve seen Dog Waste Depot liners and Hercules-grade starters work best when paired with breathable mulches and quick-cover composting. Safe composting methods break down pet waste efficiently while eliminating pathogens that could contaminate your garden beds. Proper in-ground digester placement ensures waste breaks down aerobically without creating runoff zones near plant roots.
Digester System for Patio Waste
A patio digester system keeps yard-waste and food-scrap handling tidy, especially when compacting a small compost zone near (Rhododendron spp.) beds and keeping foot traffic off the working area.
I place the digester in a low-traffic corner, high enough for drainage, and I avoid buried utilities by calling 811 first. I build with a 55-gallon barrel or a trash-can insert, drill 12 air holes only below grade, then cut the bottom for seepage and add gravel for flow.
- Set it 48 inches down
- Add septic starter, within 48 hours
- Use liners for easy cleanouts
- Support pet waste composting, eco friendly practices
FAQ
How Do I Prevent Digester Odors From Escaping Above Ground?
I prevent digester odors from escaping above ground by sealing the lid tightly, using a snug liner, and directing air through an odor-control vent stack with proper ventilation techniques. I also keep holes below grade and add bacteria promptly.
Can I Use the Digester During Winter Freezing Conditions?
Yes—I keep mine running through harsh weather, though freezing slows things. I do winter maintenance by clearing snow cover, avoiding standing water, and protecting the air path, so digester efficiency stays reliable and odors stay contained.
What Waste Types Should Never Go Into the Digester?
Never put plastics, chemicals, oils, glass, diapers, meat scraps, or dog poop mixed with kitty litter. I stick to acceptable waste only, then follow simple digester maintenance so bacteria stay strong and odor stays low for you.
How Often Should I Add New Starter Bacteria After Starting?
Like a starter spark, I’d add starter bacteria only once at launch; then follow a simple maintenance schedule. I refresh with new starter every 3–6 months, or sooner if odors return, activity slows, or climate’s harsh.
How Do I Safely Dispose of Liners and Non-Biodegradable Materials?
I safely dispose of liners and non-biodegradable parts by keeping them sealed, then using local recycling options for plastics where accepted; otherwise, bag them as hazardous waste. I never compost or flush liners, and I follow my city’s rules.
References
- https://bowwowwaste.com/dog-waste-station-installation/
- https://www.youtube.com/watch?v=HOUzgb8jVb8
- https://diyprojects.com/pet-waste-digester-underground/
- https://www.ri-industries.com.au/how-to-make-a-pet-waste-digester/
- https://www.instructables.com/Dog-Waste-Compost-Bin/
- https://herculesinc.com/wp-content/uploads/2022/11/UC-12-386-R0-012621-Pet-Waste-Station-2.pdf
- https://www.youtube.com/watch?v=if_nHfA93Mk
- https://www.youtube.com/watch?v=PBdoRELeONI
- https://dogwastedepot.com/installation-instructions-all-stations/
- https://images.thdstatic.com/catalog/pdfImages/8a/8aae818b-4a07-441d-9508-ebb2306d0db8.pdf