Last winter, my orange tabby Tomás gave me the side-eye for offering him a cardboard box. Rookie mistake.
So I built him a fortress.
24″×18″×18″ of feline luxury. Plywood bones. Rigid foam guts. Mylar lining that catches his body heat like a greedy little hug. The entrance? Off-center 6-inch flap of marine-grade neoprene because Tomás, dramatic as ever, refused to push through stiff plastic.
I raised the whole thing on 2x4s. Added a heated pad. Watched him melt into that straw bedding like butter on toast.
The GFCI wiring almost killed my soul. Worth it though. That cross-braced floor could survive a minor apocalypse. Shingled roof. Recessed acrylic window so he can judge the neighborhood squirrels in comfort.
He still ignores me when it’s warm out. Cats, right?
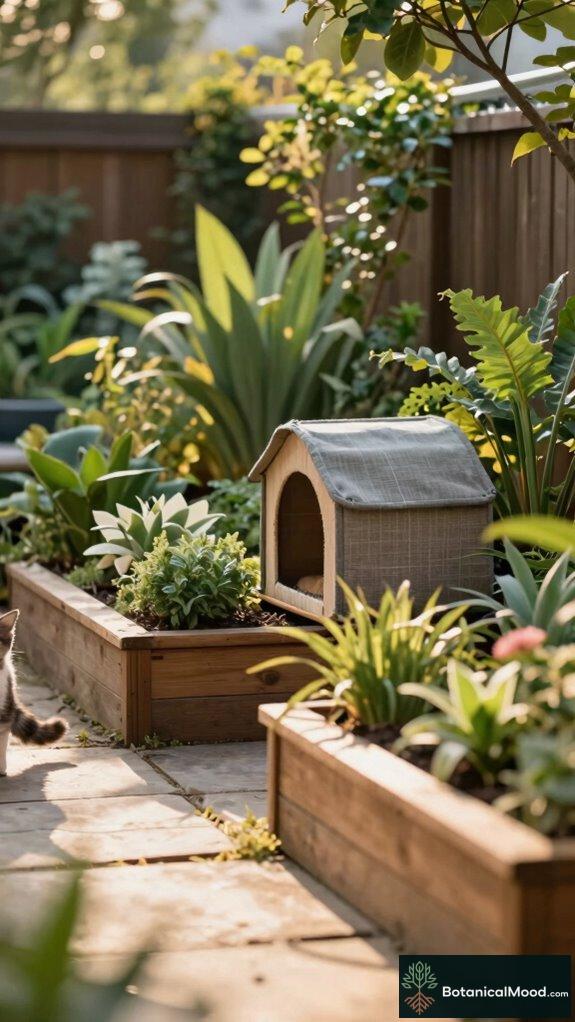
Backyard Cat Sanctuary Garden Layout Ideas
I killed three lavender bushes figuring this out.
Turns out cats and landscaping have opinions. I tucked Tomás’s house beneath my overgrown hydrangea hedge on the south-facing foundation wall. Created a windbreak. Added catmint nearby because apparently I’m running a spa now.
The paver stone path? His idea. Sharpened claws on everything else until I gave him textured surfaces. vertical cedar scratch post wrapped in sisal rope, weather-sealed wooden planters with wheatgrass and valerian root, permeable gravel drainage system, feline enrichment zones, low-maintenance ground cover like creeping thyme between flagstones, solar-powered path lighting for his midnight patrols, pollinator garden border with native wildflowers that somehow attracted more mice which he definitely noticed
My neighbor thinks I’m insane. Her cat sleeps on her porch now. Coincidence? Doubtful.
Quick Takeaways
- Build an insulated shelter about 24″×18″×18″ with raised floor to retain heat and stay dry.
- Place the shelter in a sheltered corner, near a foundation, or under a deck and elevate it on bricks or a 2×4.
- Insulate walls, floor, and ceiling with rigid foam and Mylar reflective layers, sealing seams with tape and silicone.
- Cut a small off-center 6″ entrance with a windproof flap and a hinged slanted roof to block drafts and precipitation.
- Add straw bedding and a GFCI-protected pet-safe heated pad, and perform routine checks and maintenance.
Choose the Right Size and Location for an Insulated Outdoor Cat House
One ideal size I recommend for an insulated outdoor cat house is compact—roughly 24″ wide by 18″ deep and 18″ high—because minimal internal air volume helps cats (Felis catus) conserve heat while still allowing space for one to two adults, straw bedding, and a low-voltage heated pad.
I favor these advantageous dimensions for efficiency and climate adaptability. Senior cats benefit significantly from heated cat houses designed specifically to address the comfort needs of aging felines during cold months.
I advise selecting location considerations like a sheltered corner, near a foundation or under a deck, with proper elevation on bricks or a 2×4 platform to avoid damp, and incorporating weather protection, entrance design with a 6″ off-center hole and flap, robust safety features, and proven insulation methods. Investing in insulation kits can significantly enhance your outdoor shelter’s ability to maintain warmth during harsh winter conditions.
Materials & Tools Checklist: Affordable, Weatherproof, Insulated Options
Because durable, weatherproof materials make the difference between a short-lived shelter and a reliable winter refuge, I’ll list affordable, insulated options that balance thermal performance, ease of assembly, and field durability for outdoor cats (Felis catus). Just as backyard course design requires careful planning of spatial layout, creating an effective cat shelter demands thoughtful arrangement of insulation layers and entry points.
I recommend material selection emphasizing plywood (1/2″), 18‑gal plastic bins, 50mm foam boards, mylar reflective layers, and pet-safe heated pads; insulation types include polystyrene, fiberglass (14–20 sq ft), and layered Styfoam; budget considerations typically range $100–300, roofing shingles optional for waterproof options, and sturdy construction relies on screws, wood glue, silicone sealer. Senior cats benefit from heated garden shelters that provide essential warmth during cold months.
- Tool essentials: drill, saw, hammer, box cutter.
- Design features: hinged slanted roof, recessed acrylic window.
- Heating solutions: low‑voltage heated mat, secure placement.
Build the Raised Floor and Sturdy Frame for Weather Protection
Having laid out insulated walls, a heated pad option, and an outer shell in the materials checklist, I’ll now show how to build a raised floor and sturdy frame that keeps the shelter dry, wind‑protected, and thermally efficient; elevating the shelter on bricks, concrete blocks, or a 2×4 platform reduces conductive heat loss to frozen ground, prevents water ingress from melting snow, and deters small predators.
I design elevation techniques using 4–9 bricks or an 2×4 lumber platform, cross‑brace joists, and treated plywood or 1/2″ sheet frame materials, anchoring to concrete or compacted soil, allowing drainage, airflow, and easy access for maintenance.
Insulate Walls, Floor, and Ceiling With Foam and Reflective Layers
I’ll start by fitting rigid foam panels (3/4″ polystyrene or 50mm extruded XPS) snugly against the interior faces of the shelter—walls, floor and ceiling—because that continuous, high-R-value layer dramatically reduces convective and conductive heat loss and keeps the cat’s thermal envelope compact; I then add a layer of Mylar or reflective coatings to bounce radiant heat back to the animal, pairing insulation materials for performance and minimal bulk. For additional protection in extreme cold climates, consider using weatherproof kennel covers designed to shield your shelter from wind and moisture infiltration. Reflective insulation panels are particularly effective at maximizing thermal comfort by reflecting body heat back into the enclosed space.
- cut panels to fit snugly, seal seams with tape and silicone
- add doubled polystyrene on the floor under plywood
- face interior with reflective coatings or Mylar for radiant return
Cut a Small Off‑Center Entrance and Add a Windproof Flap
I cut a small, six‑inch diameter entrance off‑center and low on the shelter wall so the opening sits a few inches above the insulated floor, which helps retain the cat’s body heat and keeps wind, rain, and snow from blowing directly into the sleeping cavity; for rigid builds I use a 6″ hole saw on plywood or an adjustable hole cutter on a storage‑bin lid, while for Styrofoam‑lined interiors I score and remove the foam with a utility knife before routing the outer shell, ensuring the hole edges are smooth, deburred, and sealed with clear silicone to block drafts and moisture.
I add a short, flexible flap of heavy vinyl or canvas, anchored above the entrance with stainless screws and a strip of weather‑rated Velcro so it overlaps by two inches; selecting windproof materials like marine vinyl, PVC‑coated fabric, or neoprene, I consider color (forest green, slate gray) for camouflage and UV resistance, and trim the opening with a thin acrylic collar for durability and reduced abrasion.
Install a Pet‑Safe Heated Pad and Safe Wiring Practices
Why choose a pet‑safe heated pad for a winter cat shelter, and how do you install it without compromising safety or insulation performance? I prefer low‑voltage, outdoor‑rated heated pads (pet‑safe brands), because they balance warmth and energy efficiency, offering a reliable heating alternative to risky heaters while preserving insulation layers like polystyrene and straw. These heated solutions work similarly to insulated dog houses designed for senior pets, providing consistent warmth throughout colder months. Heated dog bowls can also supplement your cat’s comfort by ensuring water remains unfrozen during extreme cold weather.
- Place the pad on top of polystyrene layers, not directly on straw, secure edges with zip ties or Velcro.
- Route cord through a sealed grommet, keep connections elevated, use GFCI-protected outlet for electrical safety.
- Test pad temperature, inspect monthly, replace if damaged.
Finish, Place, and Maintain the Shelter for Winter Hardiness
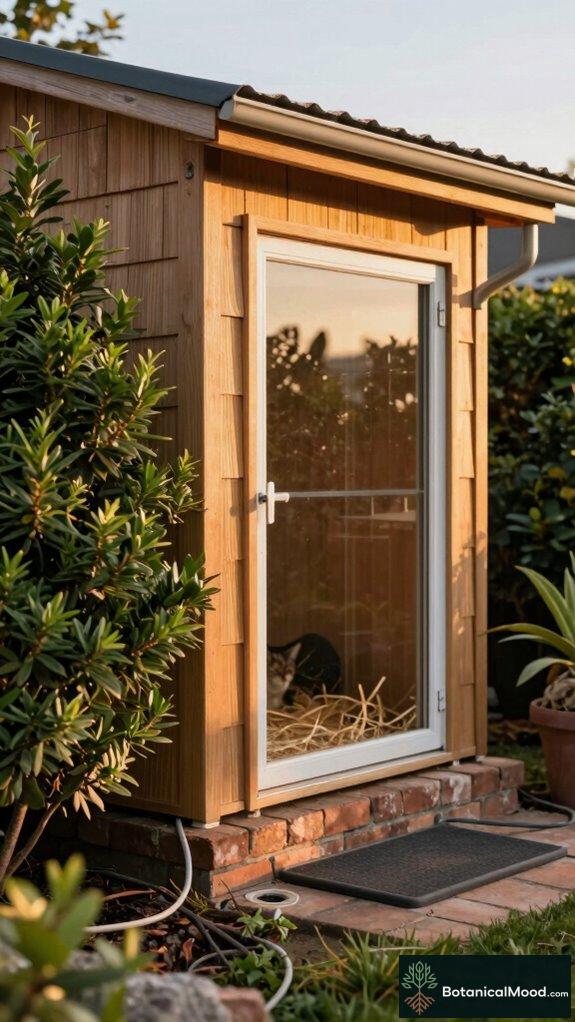
Having secured the heated pad and routed the cord through a sealed grommet, I’m turning my attention to finishing, siting, and maintaining the shelter so it withstands cold, damp, and snow; proper finish work—exterior paint, roofing shingles or metal cap, sealed acrylic windows—and a well-chosen placement will prolong the structure’s life and keep felines comfortable.
I choose durable exterior paint (acrylic latex, satin finish), cedar shingles or galvanized metal cap, sealed polycarbonate windows, and elevated brick or pallet foundation; shelter placement favors leeward corners, under eaves, near dense shrubs (Taxus baccata) for windbreak. Reflective insulation panels can be installed beneath the roofing materials to maximize heat retention and reduce heat loss during harsh winter months.
Scheduled winter maintenance includes seal inspections, fresh straw, drainage clearing, and hardware checks.
Rooftop Heated Cat Terrace
One winter morning I climbed onto the flat roof above the garage to survey where a rooftop heated cat terrace would live, and I quickly sketched a plan that balances insulation, drainage, and feline comfort so your terrace performs through snow, sleet, and freeze-thaw cycles.
I describe a compact cat terrace design using 2×4 framing, 50mm polystyrene layers, acrylic windbreaks, and a pet-safe heated pad, elevating the platform on bricks for drainage and winter cat safety.
- Insulation: mylar, foam board, polystyrene layers.
- Drainage: sloped membrane, shingles.
- Comfort: straw bedding, acrylic windows.
The best heated pet pads provide consistent warmth throughout winter months while remaining safe for feline contact. For maximum winter protection, consider pairing your rooftop terrace with insulated hutch covers designed to shield against harsh weather conditions while maintaining adequate ventilation for your cat’s safety.
Herb-Safe Catnip Corner
I’m setting aside a sheltered corner of the terrace to create a compact, herb-safe catnip corner that balances feline stimulation with garden best practices, using Nepeta cataria and companion herbs like cat thyme (Teucrium marum) and valerian (Valeriana officinalis) in raised cedar planters, lined with 50mm polystyrene beneath a 1/2″ plywood base for winter insulation and elevated on bricks to improve drainage and deter damp;
I’ll choose well-draining loam-sand mix amended with compost and a slow-release organic fertilizer (N‑P‑K 5‑3‑3) to support steady growth, position the planters to receive morning sun and afternoon shade to prevent leaf scorch, and integrate a low fence or acrylic windbreak to reduce drift from the adjacent heated cat terrace while allowing cats easy access for foraging and safe rubbing.
I prioritize catnip benefits, scent zoning, pest-resistant planting, muted sage-green and cedar tones, labeled polycarbonate window markers, drip irrigation micro-tubing, and compact layout for cozy corners.
FAQ
How Do I Prevent Other Animals From Entering the Shelter?
I seal and monitor access: I use animal proofing techniques like one-way flaps, offset shelter entrance designs, raised platforms, secure fasteners, motion-activated deterrents, and snug gaps to keep larger animals out while letting cats enter safely.
Can I Relocate the Shelter Seasonally Without Rebuilding?
Yes — I’ve found relocating works; I’ll use transport options like a wheeled platform or pallet and consider seasonal considerations for insulation, elevation, and predator access, so I don’t rebuild yet and stay innovative.
What Scents Deter Predators Without Harming Cats?
I recommend natural deterrent options like citrus peels, lavender sachets, and eucalyptus sprigs; I prefer safe scent choices that won’t harm cats, and I’ll innovate by rotating blends and using sealed dispensers to avoid overstimulation.
How Often Should Straw Bedding Be Completely Replaced?
Honestly, I replace straw bedding completely every 4–6 weeks; repetition reminds me cleanliness matters. I’ll also check weekly for dampness, consider straw maintenance, and experiment with bedding alternatives like sealed foam pads or replaceable liners for innovation.
Can Multiple Cats Comfortably Share One Small Shelter?
Yes — I think multiple cats can share one small shelter if I design for cat behavior, optimize shelter design for minimal airspace, stagger entrances, provide layered insulation, and monitor interactions for stress or dominance issues.
References
- https://tractive.com/blog/en/safety/the-perfect-heated-cat-house
- https://www.instructables.com/Heated-Winter-Cat-Shelter/
- https://www.youtube.com/watch?v=Ij8OJRAR0tA
- https://myoutdoorplans.com/animals/insulated-cat-house-plans/
- https://alleycatadvocates.org/creating-winter-shelters/
- https://www.alleycat.org/wp-content/uploads/2012/10/Caregiver-Cat-Shelter_317P.pdf
- https://www.youtube.com/watch?v=sM82YBcmS_A